Barbie Cake Recipe : How to Make a Stunning Dessert
Barbie cakes are a delightful way to make any celebration extra special, especially for birthdays. With their stunning design and vibrant colors, Barbie cakes capture the imagination and bring joy to children and adults alike. In this article, we will explore the elements that make a Barbie cake so enchanting, delve into its origins, and provide a detailed, step-by-step Barbie cake recipe. Whether you’re an experienced baker or a novice, this guide will help you create a stunning Barbie cake that will be the highlight of any party.
The Popularity of Barbie Cakes Recipe
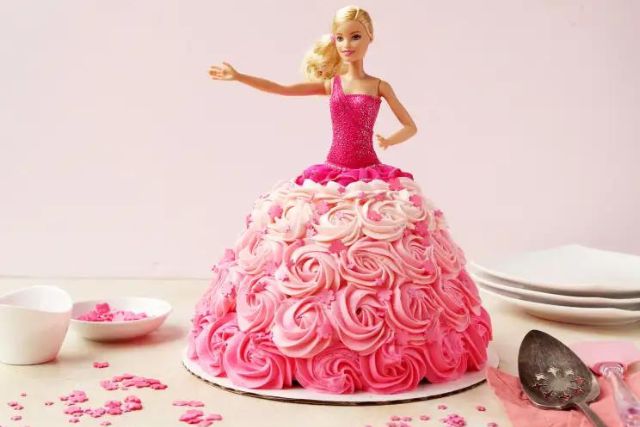
Barbie cakes have become a popular choice for birthdays and special occasions due to their whimsical and eye-catching designs. These cakes typically feature a Barbie doll dressed in a beautiful gown, with the skirt made entirely of cake. The popularity of Barbie cakes has surged with the rise of social media platforms like Instagram and Pinterest, where creative cake designs are widely shared and admired. Not only do Barbie cakes look impressive, but they also offer a delicious treat that everyone can enjoy.
Elements of a Barbie Cake Recipe
A Barbie cake Recipe typically features several key elements:
- Doll Centerpiece: A Barbie doll is the centerpiece of the cake, with the cake forming the skirt of her dress.
- Layered Cake: The skirt is made up of multiple layers of cake, often with vibrant colors for a visually striking effect.
- Buttercream Frosting: Smooth, creamy buttercream frosting is used to cover the cake and create the details of the dress.
- Fondant Decorations: Fondant is used for intricate decorations, such as ruffles, flowers, and other embellishments.
- Piping and Detailing: Piping techniques are used to add texture and details to the dress.
Ingredients for Barbie Cake Recipe
For the Cake:
- 3 cups all-purpose flour
- 2 1/2 teaspoons baking powder
- 1/2 teaspoon salt
- 1 1/2 cups unsalted butter, room temperature
- 2 1/2 cups granulated sugar
- 6 large eggs, room temperature
- 2 teaspoons vanilla extract
- 1 cup whole milk, room temperature
- Food coloring (gel-based for vibrant colors)
For the Buttercream Frosting:
- 2 cups unsalted butter, room temperature
- 8 cups powdered sugar
- 1/4 cup heavy cream
- 2 teaspoons vanilla extract
- Food coloring (various colors for the dress)
- Edible glitter and sprinkles for decoration
For the Fondant Decorations:
- White fondant (for dress details)
- Various colors of fondant (for flowers, bows, etc.)
- Edible markers (for detailing)
Additional Supplies:
- Barbie doll or similar doll
- Mixing bowls
- Electric mixer or stand mixer
- Measuring cups and spoons
- Whisk
- Spatula
- Three 8-inch round cake pans
- One 6-inch round cake pan (optional for additional height)
- Cooling racks
- Rolling pin
- Fondant tools
- Piping bags and tips
- Cake board
- Offset spatula or cake smoother
Step-by-Step Barbie Cake Recipe
Step 1: Prepare the Cake
- Preheat the Oven: Preheat your oven to 350°F (175°C). Grease and flour three 8-inch round cake pans and one 6-inch round cake pan (if using) or line them with parchment paper.
- Mix Dry Ingredients: In a medium mixing bowl, whisk together the flour, baking powder, and salt. Set aside.
- Cream Butter and Sugar: In a large mixing bowl, beat the butter and sugar together with an electric mixer until light and fluffy, about 3-4 minutes.
- Add Eggs and Vanilla: Add the eggs one at a time, beating well after each addition. Stir in the vanilla extract.
- Combine Wet and Dry Ingredients: Gradually add the flour mixture to the butter mixture, alternating with the milk, beginning and ending with the flour mixture. Mix until just combined.
- Divide and Color the Batter: Divide the batter evenly into three or four bowls. Add a few drops of different food coloring to each bowl to create vibrant colors. Stir until the colors are evenly distributed.
- Bake the Cakes: Pour the colored batters into the prepared cake pans and bake for 25-30 minutes, or until a toothpick inserted into the center comes out clean. Allow the cakes to cool in the pans for 10 minutes, then transfer to a wire rack to cool completely.
Step 2: Prepare the Buttercream Frosting
- Beat the Butter: In a large mixing bowl, beat the butter with an electric mixer until creamy.
- Add Powdered Sugar: Gradually add the powdered sugar, one cup at a time, beating well after each addition.
- Add Cream and Vanilla: Pour in the heavy cream and vanilla extract. Beat on high for 3-4 minutes until light and fluffy.
- Color the Frosting: Divide the frosting into several bowls and color each with different food coloring to match the layers of the dress. Reserve some white frosting for the base layer.
Step 3: Assemble the Cake
- Level the Cakes: Using a serrated knife, level the tops of the cakes if necessary.
- Layer the Cakes: Place one cake layer on a cake board or serving plate. Spread a layer of white buttercream frosting on top. Repeat with the remaining cake layers, stacking them on top of each other. If using the 6-inch cake for additional height, place it on top of the 8-inch layers.
- Crumb Coat: Apply a thin layer of white frosting over the entire cake to seal in the crumbs. Refrigerate for 30 minutes to set.
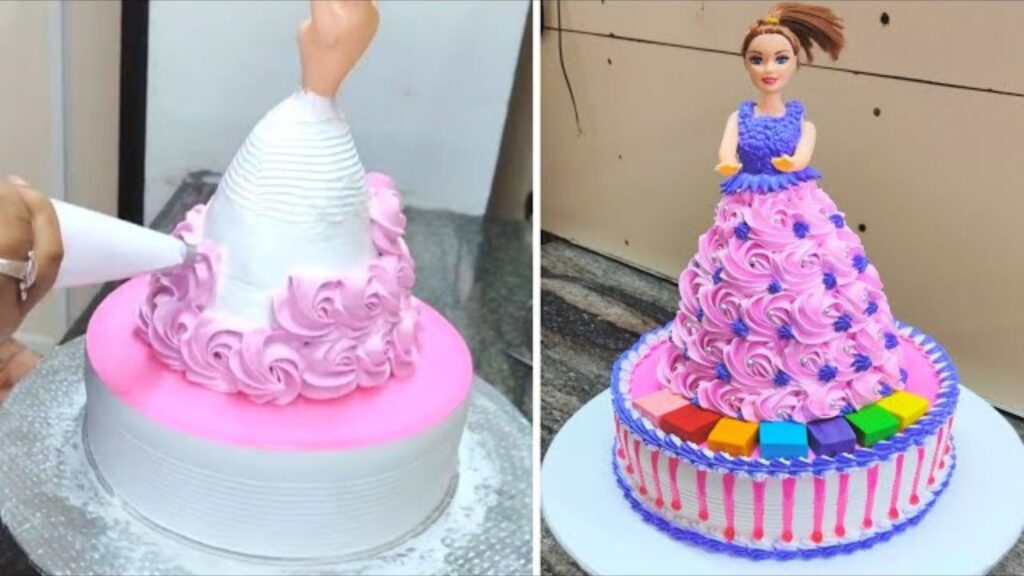
- Carve the Skirt: Using a serrated knife, carve the cake into a skirt shape, tapering towards the top to fit the doll’s waist.
- Frost the Cake: Apply a thicker layer of white frosting over the crumb coat. Smooth it out with an offset spatula or cake smoother.
Step 4: Insert the Doll
- Prepare the Doll: Remove any clothing from the Barbie doll and wrap the lower half in plastic wrap to protect it from the frosting.
- Insert the Doll: Gently insert the doll into the center of the cake, pushing down until the cake reaches her waist.
Step 5: Decorate the Cake
- Pipe the Dress: Fill piping bags fitted with various tips (such as star and round tips) with the colored buttercream frosting. Pipe swirls, rosettes, and other shapes to create the dress, starting at the base and working up towards the doll’s waist.
- Add Fondant Decorations: Use fondant to create additional dress details, such as ruffles, flowers, and bows. Attach them to the cake with a dab of water or edible glue.
- Add Sprinkles and Glitter: Decorate the dress with edible glitter and sprinkles for a magical touch.
- Detail the Face: Use edible markers to create facial details or enhance existing features on the doll if desired.
Step 6: Serve the Cake
Your Barbie Doll cake is now ready to be served. Slice and enjoy the colorful, whimsical delight with your guests.
Tips for Making the Perfect Barbie Cake Recipe
- Use Gel Food Coloring: Gel food coloring provides vibrant colors without thinning the batter or frosting.
- Chill the Cake: Refrigerating the cake between frosting layers helps set the frosting and makes the final application smoother.
- Plan Ahead: Make the fondant decorations a day ahead to allow them to dry and hold their shape.
- Practice Piping: Practice piping techniques on a piece of parchment paper before decorating the cake to ensure your designs are perfect.
- Level the Cakes: Make sure to level your cake layers so they stack evenly. This helps prevent the cake from leaning or collapsing.
- Use a Turntable: A cake turntable can make frosting and decorating the cake much easier and more efficient.
Variations of Barbie Cake Recipe
Princess Barbie Cake
Use pastel colors and add more delicate decorations like lace and pearls to create a princess-themed Barbie cake.
Mermaid Barbie Cake
Create an underwater theme with blue and green hues, adding fondant scales and sea-themed decorations.
Superhero Barbie Cake
Design the dress to resemble a superhero costume with bold colors and fondant accessories like a cape and mask.
Holiday Barbie Cake
Customize the cake for different holidays, such as a Christmas Barbie cake with red and green colors or a Halloween Barbie cake with orange and black.
Unicorn Barbie Cake
Combine the unicorn and Barbie cake trends by adding a unicorn horn, ears, and a colorful mane to the Barbie doll’s dress.
Serving Suggestions for Barbie Cake Recipe
The Barbie Cake Recipe pairs well with various accompaniments and can be enjoyed in different settings:
- With Milk: Serve with a cold glass of milk for a classic combination.
- At Parties: This cake makes a stunning centerpiece for birthday parties, baby showers, and other celebrations.
- As a Gift: Wrap slices of the cake in decorative boxes or tins and give them as gifts to friends and family.
- With Ice Cream: Pair the cake with a scoop of vanilla or strawberry ice cream for an extra indulgent dessert.
Health Benefits of Homemade Cakes
Making cakes at home allows you to control the ingredients and reduce additives and preservatives. Here are some benefits of homemade cakes:
- Quality Ingredients: Use high-quality, fresh ingredients like real butter, fresh eggs, and whole milk.
- Lower Sugar Content: You can reduce the amount of sugar used in the recipe, making it slightly healthier than store-bought cakes.
- No Preservatives: Homemade cakes don’t contain preservatives, artificial flavors, or colors, making them a more natural choice.
- Customization: You can cater to dietary needs, such as gluten-free, vegan, or low-sugar, ensuring everyone can enjoy the cake.
The Barbie cake is a delightful and magical dessert that brings joy to any celebration. With its vibrant colors, whimsical decorations, and delicious taste, it’s sure to be a hit among both children and adults. By following this detailed, step-by-step Barbie cake recipe, you can create a stunning centerpiece for birthdays, parties, or any special occasion.
Experiment with different variations and decorating techniques to make the cake uniquely yours. Enjoy the process of baking and decorating this enchanting cake, and delight in the smiles it brings to your guests. Whether you’re a seasoned baker or a novice, this guide will help you craft a Barbie cake that’s as beautiful as it is delicious. Happy baking!
Frequently Asked Questions (FAQs)
Can I make the Barbie cake ahead of time?
Yes, you can bake the cake layers ahead of time. Wrap them tightly in plastic wrap and store at room temperature for up to 2 days. You can also freeze the layers for up to 3 months. Thaw them completely before assembling the cake.
Can I use store-bought fondant?
Yes, store-bought fondant works well for making the horn and ears. Just be sure to knead it until it’s smooth and pliable before shaping.
How should I store the Barbie cake?
Store the assembled cake in an airtight container at room temperature for up to 3 days. If you live in a warm climate, refrigerate the cake to prevent the frosting from melting. Bring it to room temperature before serving for the best texture.
Can I add different flavors to the cake layers?
Absolutely! You can add different extracts or flavorings to each layer of the cake. For example, try almond, lemon, or coconut extract for a unique twist. You can also add zest from citrus fruits or finely chopped nuts to enhance the flavor profile.
How do I transport the Barbie cake safely?
To transport the Barbie cake safely, place it in a sturdy cake box that fits snugly to prevent movement. If possible, use a non-slip mat or towel under the box to keep it from sliding during transport. Drive carefully, avoiding sharp turns and sudden stops.
Can I use a different type of doll for the cake?
Yes, you can use any doll that fits the size of your cake. Just make sure the doll is clean and wrap the lower half in plastic wrap to protect it from the frosting. Adjust the size of the cake to accommodate the height and proportions of the doll you choose.
How can I make the cake more stable for stacking?
To make the cake more stable for stacking, ensure that each layer is level. You can use cake dowels or straws inserted into the layers to provide additional support. Place a cake board between the tiers if you’re making a multi-tiered Barbie cake.
What type of frosting is best for a Barbie cake?
Buttercream frosting is commonly used for Barbie cakes due to its smooth texture and ease of coloring. However, you can also use Swiss meringue buttercream, cream cheese frosting, or even ganache for a different flavor and texture.
