Gyoza Recipe: How to Make Perfect Japanese Pan-Fried Dumplings at Home
Gyoza, the iconic Japanese dumplings loved all around the world, are known for their crispy golden bottoms and tender juicy fillings. Whether you enjoy them as a snack, appetizer, or a full meal, homemade gyoza taste far better than any frozen version. In this detailed guide, you’ll learn how to make traditional Japanese Gyoza recipe with the perfect balance of flavor, crispiness, and texture — right in your own kitchen.
This recipe is beginner-friendly yet authentic enough to satisfy dumpling enthusiasts. Let’s get started!
What is Gyoza?
Gyoza are Japanese-style dumplings inspired by Chinese jiaozi. They are usually filled with ground meat (commonly pork), cabbage, garlic, ginger, and seasoning. Unlike Chinese dumplings, gyoza wrappers are thinner, the shape is smaller, and they are often pan-fried to achieve the signature crispy bottom.
Traditionally, gyoza are cooked using a fry-steam-fry technique:
- Fry the dumplings for crispiness
- Steam to cook the filling
- Fry again to dry them out and enhance crunch
Why You’ll Love This Gyoza Recipe
✔ Crispy bottoms + juicy filling
✔ Full authentic Japanese flavor
✔ Easy step-by-step instructions
✔ Freezes well for quick meals
✔ Customizable filling options
Ingredients for Gyoza Recipe
For the Gyoza Filling
- 250g ground pork (or chicken)
- 1 cup finely chopped cabbage
- 2 green onions, finely chopped
- 1 tbsp minced garlic
- 1 tbsp grated ginger
- 1 tbsp soy sauce
- 1 tbsp sesame oil
- 1 tsp rice vinegar
- ½ tsp salt
- ¼ tsp black pepper
For Wrapping
- 25–30 gyoza wrappers (store-bought or homemade)
- Small bowl of water (for sealing)
For Pan-Frying
- 2 tbsp vegetable oil
- ¼ cup water (for steaming)
For Gyoza Dipping Sauce
- 1 tbsp soy sauce
- 1 tbsp rice vinegar
- ½ tsp chili oil or sesame oil
How to Make Gyoza Recipe (Step-by-Step)

1. Prepare the Cabbage
Cabbage has natural moisture, which can make the filling soggy. To prevent this:
- Add salt to chopped cabbage
- Let it sit for 10 minutes
- Squeeze out the excess water
This results in a crisp, juicy, but not watery filling.
2. Make the Filling
In a large mixing bowl:
- Add ground pork, squeezed cabbage, green onions, garlic, ginger, soy sauce, sesame oil, vinegar, salt, and pepper.
- Mix with your hands until well combined.
- Don’t overmix or the filling will become too dense.
3. Fill the Gyoza Wrappers
- Place one wrapper in your palm.
- Add 1 teaspoon of filling in the center.
- Dip your finger in water and wet half the edge.
- Fold over and pinch pleats on one side only.
This creates the classic Japanese crescent shape.
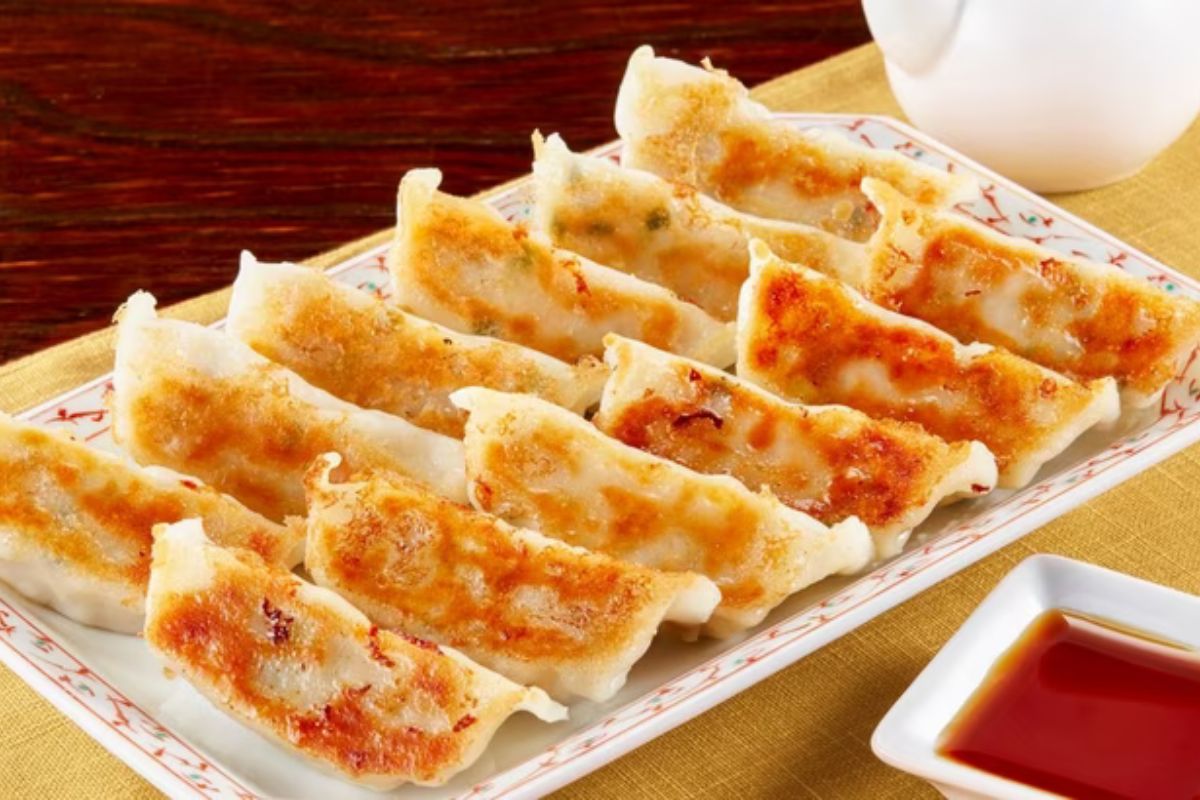
4. Pan-Fry the Gyoza
Heat 1 tablespoon oil in a nonstick pan over medium heat.
Add gyoza in a single layer (flat bottom down).
Fry for 2–3 minutes until the bottoms turn golden brown.
5. Steam the Gyoza
Add ¼ cup water to the pan.
Immediately cover with a lid and steam for 4–5 minutes.
This fully cooks the meat and tenderizes the wrapper.
6. Crisp Up Again
Once the water evaporates, remove the lid.
Add 1 tablespoon more oil and fry again for 1 minute.
Your gyoza will now have:
- Crispy bottoms
- Soft tops
- Juicy filling
Perfect every time!
How to Make Gyoza Dipping Sauce
Mix together:
- Soy sauce
- Rice vinegar
- Chili oil or sesame oil
Taste and adjust to your liking.
Some add minced garlic or grated ginger for extra flavor.
Tips for the Best Gyoza
1. Don’t Overfill
Too much filling makes wrapping difficult and causes tearing.
2. Keep Wrappers Covered
They dry out quickly; keep them under a damp cloth.
3. Use a Nonstick Pan
It prevents sticking during the fry-steam-fry process.
4. Freeze Before Cooking
If making ahead, freeze uncooked gyoza on a tray first.
Once solid, transfer to a zip bag.
5. Don’t Skip the Fry-Steam-Fry Method
This is what gives Japanese gyoza their iconic crispiness.
Homemade Gyoza Wrappers (Optional)
If you want to make the wrappers yourself, you’ll need:
- 2 cups all-purpose flour
- ½ cup hot water
- Pinch of salt
Knead, rest, roll out, and cut into thin circles.
Homemade wrappers taste fresher but require extra time.
Different Filling Variations
Chicken Gyoza Recipe
- Use ground chicken instead of pork
- Add a little extra sesame oil for moisture
Vegetarian Gyoza Recipe
- Cabbage
- Carrot
- Mushroom
- Tofu
Season the filling well for best taste.
Spicy Gyoza
- Add chili flakes
- Mix in chili oil in the filling
Shrimp Gyoza
- Combine chopped shrimp + pork for a juicy texture
What to Serve With Gyoza Recipe
Gyoza recipe pairs well with:
- Ramen
- Fried rice
- Asian soups
- Soba noodles
- Japanese salad
You can also serve it as a party appetizer.
How to Store and Freeze Gyoza
In the Refrigerator
Cooked gyoza recipe: up to 3 days
Reheat by pan-frying or microwaving.
In the Freezer
Uncooked gyoza: up to 1 month
Pan-fry directly from frozen; no need to thaw.
Nutrition Information (Approx per 1 dumpling)
- Calories: 45–55
- Protein: 2–3g
- Fat: 2–3g
- Carbohydrates: 4–5g
Values vary depending on filling and wrapper thickness.
Frequently Asked Questions for Gyoza Recipe
Can I use chicken instead of pork?
Yes, chicken works well. Increase sesame oil for juiciness.
My gyoza stick to the pan — why?
You need more oil, or your pan isn’t nonstick enough.
Can I steam gyoza without frying?
Yes, but you won’t get the crispy bottoms.
Can I bake gyoza recipe?
Yes — brush with oil and bake at 200°C (400°F) for 12–15 minutes.
Can I air-fry gyoza?
Yes — spray lightly with oil and air-fry at 180°C for 7–9 minutes.
Conclusion
Making Japanese gyoza at home is easier than you might think. With the right filling, proper wrapping, and the simple fry-steam-fry technique, you can enjoy restaurant-quality dumplings any day of the week.
Try this recipe once, and it will become your go-to version! If you love Japanese food or Asian-style appetizers, homemade gyoza is a must-try.