Ghevar Recipe: An Ultimate Classic Indian Delicacy
Ghevar is a traditional Indian dessert that shines during festive occasions like Raksha Bandhan, Diwali, and other celebrations. Originating from the Rajasthani cuisine, this disc-shaped sweet is known for its unique texture and delicate flavor. If you’ve ever wondered how to make this iconic sweet at home, you’re in the right place. In this comprehensive guide, we will provide you with an authentic ghevar recipe, detailed instructions, and tips to ensure your ghewar turns out perfect every time.
What is Ghevar?
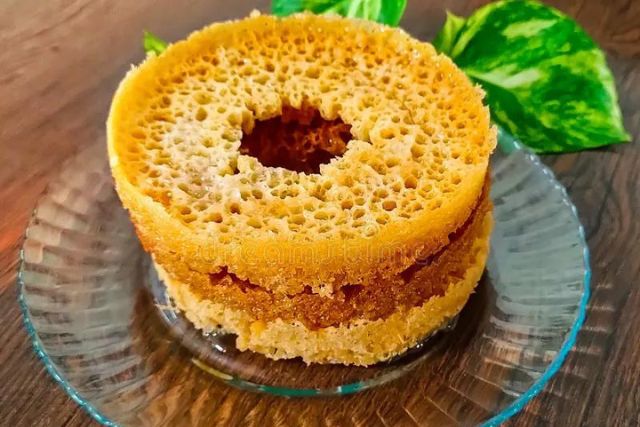
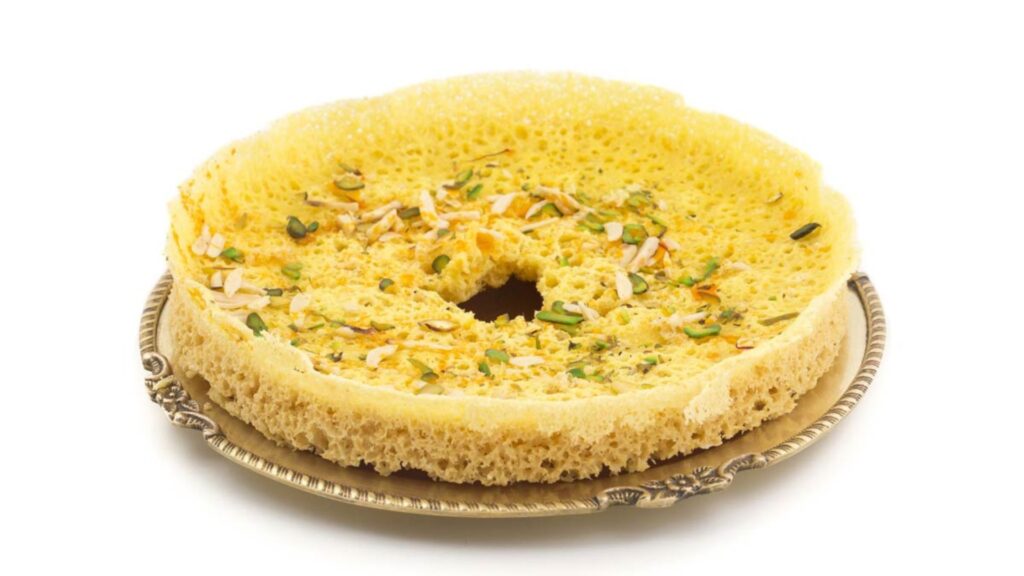
Ghevar is a popular Indian sweet made from flour, ghee (clarified butter), and sugar syrup. Its unique texture resembles a honeycomb and is achieved through a meticulous preparation process. Typically served during festivals, ghevar recipe is enjoyed for its crispy edges and soft, spongy center. It can be flavored with cardamom, saffron, or rose water, and garnished with nuts and dried fruits.
Ingredients for Ghevar Recipe
For the Ghevar Recipe Batter:
- 1 cup all-purpose flour (maida)
- ¼ cup ghee (clarified butter), melted
- 1 cup cold water
- 1 tablespoon gram flour (besan)
- ½ teaspoon baking powder
- A pinch of salt
- 1 teaspoon cardamom powder (optional)
- 1 tablespoon lemon juice (optional, for a lighter batter)
For the Sugar Syrup:
- 1 ½ cups granulated sugar
- 1 cup water
- 1 teaspoon lemon juice
- 4-5 cardamom pods
- A few saffron strands (optional, for color and aroma)
For Garnishing:
- Chopped nuts (such as almonds, cashews, and pistachios)
- Dried rose petals (optional)
- Silver leaf (optional, for traditional presentation)
Equipment Needed
- A deep frying pan or kadhai
- A large, heavy-bottomed pot
- A sieve or strainer
- A whisk
- A slotted spoon or spider
- A thermometer (for precise temperature control)
Instructions
1. Prepare the Sugar Syrup
- Combine Ingredients: In a large pot, add 1 cup of water and 1 ½ cups of granulated sugar. Stir until the sugar dissolves completely.
- Add Flavorings: Add the cardamom pods and saffron strands (if using) to the pot. Bring the mixture to a boil.
- Simmer: Reduce the heat and let the syrup simmer for about 10 minutes, or until it reaches a one-string consistency. To test, drop a small amount of syrup into a plate and check if it forms a single thread when touched with your finger.
- Add Lemon Juice: Add a teaspoon of lemon juice to the syrup to prevent crystallization. Keep the syrup warm on low heat while you prepare the ghewar batter.
2. Prepare the Ghevar Recipe Batter
- Mix Dry Ingredients: In a large mixing bowl, combine the all-purpose flour, gram flour, baking powder, and a pinch of salt. Whisk together to ensure even distribution.
- Add Ghee: Pour the melted ghee into the dry ingredients and mix well.
- Add Water: Gradually add cold water to the mixture, whisking continuously to avoid lumps. The batter should be smooth and runny. For a lighter texture, add a tablespoon of lemon juice.
- Rest the Batter: Let the batter rest for at least 30 minutes. This resting period allows the flour to absorb the water, resulting in a more consistent texture.
3. Fry the Ghevar
- Heat Oil: In a deep frying pan or kadhai, heat ghee or oil to 350°F (175°C). Use a thermometer to monitor the temperature. The oil should be hot but not smoking.
- Prepare a Mold: Traditionally, ghewar is made using a round mold, which can be a metal ring or a small, deep bowl. Place the mold in the hot oil for a few seconds to preheat it.
- Pour Batter: Carefully remove the mold from the oil and place it on a heatproof surface. Pour the prepared batter into the mold, filling it about halfway.
- Fry the Ghevar: Gently lower the mold with batter back into the hot oil. Fry the ghevar until it turns golden brown and crispy. The batter will start to form bubbles and expand as it cooks. Use a slotted spoon to carefully lift the ghewar out of the mold and allow excess oil to drain.
- Repeat: Repeat the process with the remaining batter, making sure to preheat the mold before adding each new batch of batter.
4. Soak the Ghevar
- Soak in Syrup: Once the ghevar is fried and drained of excess oil, carefully dip it into the warm sugar syrup. Let it soak for about 2-3 minutes to absorb the syrup.
- Drain Excess Syrup: Remove the ghewar from the syrup and let it drain on a wire rack or plate. The ghevar should be soft and sweet, with a delicate texture.
5. Garnish and Serve
- Garnish: While the ghevar is still warm, garnish it with chopped nuts, dried rose petals, or silver leaf, if desired. This adds both flavor and visual appeal.
- Serve: Allow the ghewar to cool completely before serving. It can be enjoyed on its own or with a side of rabri (sweetened condensed milk) for extra indulgence.
Tips for Perfect Ghevar Recipe
- Use Cold Water: Cold water helps achieve the desired texture and prevents the batter from becoming too thick.
- Monitor Oil Temperature: Maintain the correct oil temperature to ensure even frying and prevent burning. Too hot oil can result in uneven cooking, while too cool oil can make the ghevar greasy.
- Preheat the Mold: Preheating the mold helps achieve a uniform texture and prevents the batter from sticking.
- Rest the Batter: Allowing the batter to rest ensures that the flour absorbs the water fully, resulting in a better texture.
- Be Patient: Don’t rush the soaking process. Letting the ghevar soak in the syrup for the right amount of time ensures it’s sweet and flavorful.
Ghevar is a beloved Indian sweet that adds a touch of tradition and elegance to any celebration. With this detailed ghevar recipe, you can create this delightful dessert right in your own kitchen. From the preparation of the batter to the final garnishing touches, every step is designed to help you achieve the perfect ghewar that’s crispy on the edges and soft in the center.
Embrace the process, enjoy the delicious results, and impress your family and friends with this classic treat. Whether you’re celebrating a festival, hosting a special event, or simply indulging in a homemade sweet, ghewar is sure to be a standout addition to your culinary repertoire. Happy cooking and enjoy your homemade ghevar recipe!
Frequently Asked Questions (FAQs) About Ghevar Recipe
Can I Make Ghevar Ahead of Time?
Yes, ghevar can be made a day or two ahead of time. Store it in an airtight container to keep it fresh. If you’re making it several days in advance, consider storing it in the refrigerator and reheating it before serving. The texture may slightly change, but it will still be delicious.
Can I Use Oil Instead of Ghee for Frying?
While ghee is traditionally used for its rich flavor, you can substitute oil if preferred. Use a neutral oil with a high smoke point to ensure proper frying. The ghevar will be slightly different in taste but still enjoyable.
How Can I Adjust the Sweetness of the Ghevar?
You can adjust the sweetness by modifying the sugar syrup. If you prefer a less sweet ghevar, reduce the amount of sugar in the syrup. Conversely, for a sweeter treat, increase the sugar quantity.
Can I Add Flavors to the Ghevar Batter?
Yes, you can add flavors such as cardamom, saffron, or rose water to the ghevar batter to enhance its taste. Simply mix these flavorings into the batter before frying. Experiment with different flavors to create a unique twist on the classic recipe.
What Should I Do If My Ghevar Doesn’t Rise Properly?
If your ghevar doesn’t rise as expected, it could be due to the batter being too thick or the oil temperature being too low. Ensure that the batter is runny and the oil is at the correct temperature for optimal frying. If needed, adjust the batter consistency with a bit more water.
