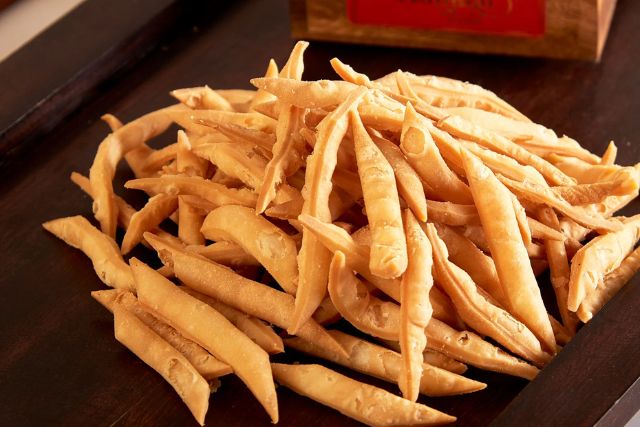
How to Cook Namak Para Recipe: Home Made Crunchy Snack
When it comes to Indian snacks, there’s no shortage of flavors that excite the palate. From the tangy sweetness of seviyan (vermicelli) to the rich, spicy crunch of samosas, and the delightful crispiness of shakarpara and gujiya, India’s culinary offerings are endless. But today, we’re diving into one of the simplest, yet most loved, Indian snacks—Namak Para. Whether you’re preparing for a festival, tea-time, or just looking for something to munch on, NamakPara Recipe is the perfect solution. It’s crispy, crunchy, and mildly spiced with the perfect balance of saltiness that makes it a favorite snack for people of all ages.
But how do you make this crunchy snack at home? Don’t worry—I will walk you through everything you need to know, from the NamakPara recipe ingredients to a step-by-step Namak Para recipe and even tips and tricks to get that perfect crispiness.
So, roll up your sleeves and let’s get cooking with this ultimate guide to the NamakPara recipe!
What is Namak Para?
Before we jump into the recipe, let’s take a moment to understand what Namak Para is.
Namak Para is a traditional Indian snack that’s perfect for any occasion—be it a festival, family gathering, or even as an everyday snack with tea. The name “Namak Para” literally translates to “salty pieces,” and it’s an apt description for this crispy, crunchy treat. Made with simple ingredients like flour, ghee or oil, and spices, Namak Para is deep-fried to golden perfection.
Unlike some other Indian snacks, NamakPara is savory and not overly spiced, making it a great Recipe for people who prefer subtle flavors. It’s often enjoyed with a hot cup of tea or coffee and makes an excellent companion during festivals like Diwali or Holi.
Now, let’s look at the ingredients that go into making the perfect Namak Para.
Namak Para Recipe Ingredients
To make NamakPara at home, you’ll need a few simple ingredients. Here’s a list of what you’ll need:
For the Dough:
- All-purpose flour (maida) – 2 cups
- Caraway seeds (ajwain) – 1 teaspoon
- Cumin seeds (jeera) – 1 teaspoon
- Salt – 1 teaspoon (or as per taste)
- Black pepper – ½ teaspoon
- Turmeric powder – ¼ teaspoon (optional for color)
- Baking soda – ½ teaspoon (helps with crispiness)
- Ghee or oil – 1.5 tablespoons (for a rich dough)
- Water – as needed to form a smooth dough
For Frying:
- Oil – for deep frying (use vegetable oil or sunflower oil)
Step-by-Step NamakPara Recipe
Now that we’ve gathered our Namak Para recipe ingredients, let’s get into the cooking process. Here’s how you can make this crispy, crunchy snack at home with ease.
Step 1: Preparing the Dough
The first step is to prepare the dough for NamakPara. Follow these instructions:
- Sift the flour: Start by sifting the all-purpose flour (maida) to ensure there are no lumps. This will help you achieve a smoother dough.
- Mix the dry ingredients: In a large mixing bowl, combine the sifted flour, salt, caraway seeds (ajwain), cumin seeds (jeera), black pepper, turmeric powder, and baking soda. Mix them well.
- Add the ghee or oil: Add ghee or oil to the flour mixture. Gently rub it into the flour with your fingers until the mixture resembles breadcrumbs. The ghee or oil adds richness and helps in making the dough crisp.
- Add water gradually: Begin adding water, a little at a time, and knead it into the flour. The goal is to form a smooth, firm dough. The dough should be soft but not sticky. If it’s too soft, your Namak Para might not be as crispy.
- Let the dough rest: Once the dough is kneaded, cover it with a damp cloth and let it rest for about 15-20 minutes. This resting period allows the dough to relax, making it easier to roll out.
Step 2: Rolling the Dough
Once the dough has rested, it’s time to roll it out:
- Divide the dough: After resting, divide the dough into smaller portions. Take one portion and roll it into a ball.
- Roll out the dough: Using a rolling pin, roll out each dough ball into a thin sheet. Try to roll the dough as thin as possible, but not so thin that it tears. The thinner the dough, the crispier your Namak Para will be.
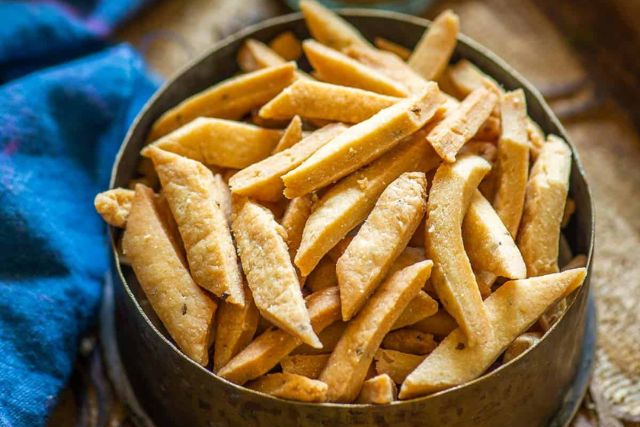
- Cut the dough: Once you have rolled out the dough, use a knife or a pizza cutter to cut it into your desired shapes. You can cut them into diamonds, squares, or long strips, depending on your preference.
Step 3: Frying the NamakPara
Now comes the fun part—frying!
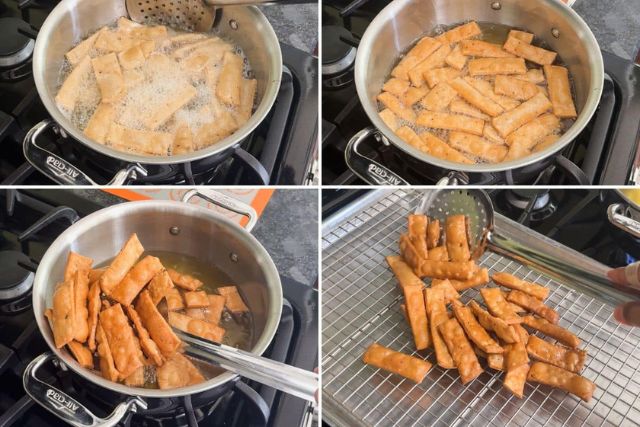
- Heat the oil: In a deep frying pan or wok, heat oil on medium heat. You need enough oil to submerge the NamakPara pieces for frying.
- Test the oil temperature: To check if the oil is hot enough, drop a small piece of dough into the oil. If it rises to the surface quickly, the oil is ready. If it browns too quickly, the oil is too hot, and if it doesn’t float, the oil is not hot enough.
- Fry the NamakPara: Carefully drop the cut pieces of dough into the hot oil. Fry them in batches to avoid overcrowding the pan. Fry each batch until the Namak Para turns golden brown and crispy, which usually takes around 4-5 minutes.
- Drain the excess oil: Once they are golden and crispy, use a slotted spoon to remove them from the oil and place them on a paper towel to absorb excess oil.
Step 4: Cooling and Storing
Let the Namak Para cool down completely on a tray or cooling rack. Once they are cool, store them in an airtight container. They will stay crispy and fresh for about 1-2 weeks.
Tips for Perfect Namak Para Recipe
- Don’t Over Knead the Dough: While kneading the dough, make sure not to overdo it. Over-kneading the dough can make your NamakPara tough rather than crispy.
- Maintain the Right Oil Temperature: It’s important to fry the Namak Para on medium heat. If the oil is too hot, the outside will cook too quickly, and the inside will remain raw. If it’s too cold, the dough will absorb too much oil and become greasy.
- Use Ghee for Richness: If you want to elevate the flavor, use ghee instead of oil for the dough. This will give the NamakPara a rich and fragrant taste that enhances the overall snack.
- Rest the Dough: Always allow the dough to rest before rolling. This relaxes the gluten, making it easier to roll out and shape without it shrinking back.
Namak Para Variations Recipe
Namak Para can be customized in many ways. Here are some variations you can try:
- Spicy NamakPara: Add chili powder or cayenne pepper to the dough for an extra spicy kick.
- Herbed Namak Para: Incorporate oregano or dried thyme into the dough for an Italian twist.
- Cheese NamakPara: Add grated cheese to the dough for a cheesy, savory flavor.
Feel free to experiment with different spices and flavors to make your NamakPara your own!
Storing Namak Para
Once your Namak Para is completely cooled, store it in an airtight container at room temperature. Properly stored, NamakPara can last up to 1-2 weeks without losing its crispiness. Avoid storing it in a humid area to ensure it remains crunchy.
How to Serve Namak Para
Namak Para is a versatile snack that can be served in many ways:
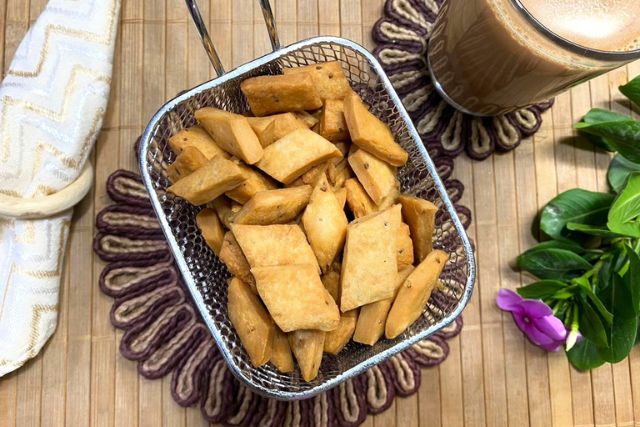
- With Tea: The classic pairing for NamakPara is with a cup of hot tea. The crispy, savory texture of the Namak Para complements the warmth of the tea.
- As a Snack: Serve NamakPara on its own for a light snack. It’s perfect for guests or a quick munch during a movie night.
- With Dips: Pair it with a variety of dips, like tomato ketchup, green chutney, or yogurt-based dips for added flavor.
Conclusion
Making your own Namak Para at home is an enjoyable and rewarding experience. With just a few simple ingredients and a bit of time, you can prepare a crispy, flavorful snack that will delight your taste buds. Whether it’s for a festive occasion, a tea-time snack, or just something to munch on, NamakPara is a treat that’s always sure to please.
With this step-by-step NamakPara recipe, you’re all set to make this savory snack in your own kitchen. Follow the instructions carefully, and with a little practice, you’ll be able to make perfect Namak Para every time. So, gather your ingredients, get frying, and enjoy this deliciously crispy snack with your loved ones!
Frequently Asked Questions
Can I bake Namak Para instead of frying?
Yes, you can bake Namak Para for a healthier alternative. Preheat the oven to 350°F (175°C), place the pieces on a baking sheet lined with parchment paper, and bake for 15-20 minutes or until golden brown and crispy. However, baking may not yield the same level of crispiness as deep-frying.
Can I store Namak Para? How long will it stay fresh?
Yes, Namak Para can be stored in an airtight container at room temperature for up to 2 weeks. Make sure the snack is completely cooled before storing to maintain its crispiness. Avoid storing it in a humid environment.
What can I serve with Namak Para?
You can enjoy Namak Para with a variety of dips, such as green chutney, tomato ketchup, or yogurt-based dips. It’s also great on its own as a snack with a cup of chai or coffee.
Can I add other ingredients to the dough?
Yes! Feel free to get creative with your Namak Para dough. You can add finely chopped herbs, cheese, or sesame seeds to the dough for added flavor. Experiment with different spices to make it unique to your taste.
Can I use whole wheat flour instead of all-purpose flour?
Yes, you can substitute whole wheat flour for all-purpose flour (maida) to make a healthier version of Namak Para. However, it may result in a slightly denser texture and a more earthy flavor.