Bassoon Cake Recipe : Crafting a Delightful Musical Masterpiece
Are you a music lover or know someone who is passionate about the bassoon? If you’re looking for a unique and creative way to celebrate a special occasion, a bassoon cake might be just what you need. This detailed guide will walk you through making a bassoon cake Recipe from scratch, perfect for birthdays, recitals, or any event that calls for a musical touch. With step-by-step instructions, tips, and tricks, you’ll create a cake that looks impressive and tastes delicious.
Why Make a Bassoon Cake?
A bassoon cake is not only a treat for the taste buds but also a visual delight. The bassoon, with its intricate design and rich, deep tones, can inspire a cake that’s both beautiful and meaningful. Whether for a dedicated bassoon player or a music-themed party, this cake is bound to be a showstopper.
Ingredients for Bassoon Cake Recipe
For the Cake:
- 2 1/2 cups all-purpose flour
- 2 1/2 teaspoons baking powder
- 1/2 teaspoon salt
- 1 cup unsalted butter, room temperature
- 2 cups granulated sugar
- 4 large eggs, room temperature
- 1 teaspoon vanilla extract
- 1 cup whole milk
For the Buttercream Frosting:
- 1 1/2 cups unsalted butter, room temperature
- 6 cups powdered sugar
- 1/4 cup heavy cream
- 2 teaspoons vanilla extract
- Food coloring (brown and black)
For the Decoration:
- Fondant (white, brown, black)
- Edible gold paint or luster dust
- Edible markers (black)
- Piping gel
Step-by-Step Guide to Making a Bassoon Cake Recipe
Step 1: Bake the Cake
- Preheat the Oven: Preheat your oven to 350°F (175°C). Grease and flour two 9-inch round cake pans.
- Mix Dry Ingredients: In a medium bowl, whisk together the flour, baking powder, and salt. Set aside.
- Cream Butter and Sugar: In a large bowl, beat the butter and sugar together until light and fluffy, about 3-4 minutes.
- Add Eggs and Vanilla: Add the eggs one at a time, beating well after each addition. Stir in the vanilla extract.
- Combine Wet and Dry Ingredients: Gradually add the flour mixture to the butter mixture, alternating with the milk. Begin and end with the flour mixture. Mix until just combined.
- Bake: Divide the batter evenly between the prepared pans. Bake for 25-30 minutes, or until a toothpick inserted into the center comes out clean. Allow the cakes to cool in the pans for 10 minutes, then transfer to a wire rack to cool completely.
Step 2: Prepare the Buttercream Frosting
- Beat the Butter: In a large bowl, beat the butter until creamy.
- Add Powdered Sugar: Gradually add the powdered sugar, one cup at a time, beating well after each addition.
- Add Heavy Cream and Vanilla: Pour in the heavy cream and vanilla extract. Beat on high for 3-4 minutes until light and fluffy.
- Color the Frosting: Divide the frosting into two portions. Color one portion brown and the other portion black using food coloring. Set aside.
Step 3: Assemble the Cake
- Level the Cakes: Using a serrated knife, level the tops of the cakes if necessary.
- Layer the Cakes: Place one cake layer on a serving plate. Spread a layer of buttercream frosting on top. Place the second cake layer on top and press gently to adhere.
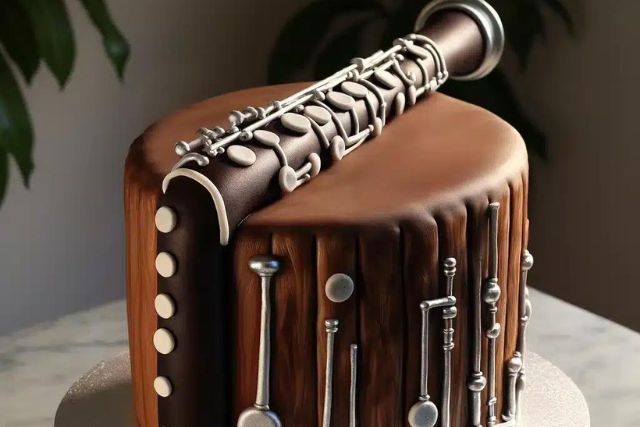
- Carve the Shape: Using a sharp knife, carve the cakes into the shape of a bassoon. This will involve some creativity and patience. Start by trimming the sides to create a long, narrow shape, then carve the details of the bassoon body and bell.
- Crumb Coat: Apply a thin layer of frosting to the entire cake to seal in the crumbs. Refrigerate for 30 minutes to set.
Step 4: Decorate the Cake
- Frost the Cake: Apply a thicker layer of the brown frosting to the entire cake. Smooth it out with an offset spatula.
- Add Fondant Details: Roll out the white, brown, and black fondant. Cut out shapes to mimic the keys, reeds, and other details of the bassoon cake recipe. Attach these pieces to the cake using a small amount of piping gel.
- Add Edible Gold Paint: Use edible gold paint or luster dust to highlight certain areas of the bassoon, such as the keywork.
- Add Final Touches: Use edible markers to add any final details or fine lines.
Step 5: Serve and Enjoy
Once the bassoon cake Recipe is decorated to your satisfaction, it’s ready to be served. This cake is sure to be a showstopper at any musical event or celebration. Enjoy the delicious combination of moist cake and creamy buttercream with your friends and family.
Tips and Tricks for a Perfect Bassoon Cake Recipe
- Use a Template: Print out a picture of a bassoon to use as a template for carving the cake. This can help ensure accuracy and detail.
- Chill the Cake: Chilling the cake layers before carving can make the process easier and prevent crumbling.
- Smooth Fondant: Use a fondant smoother to achieve a polished look on the fondant-covered cake.
- Practice Patience: Decorating a bassoon cake is a detailed process. Take your time and enjoy the creative journey.
Variations and Customizations
Flavor Variations
While the classic vanilla cake is a crowd-pleaser, you can experiment with different flavors to suit your taste:
- Chocolate Cake: Replace some of the flour with cocoa powder for a rich, chocolatey bassoon cake.
- Lemon Cake: Add lemon zest and juice for a refreshing, citrusy twist.
- Red Velvet Cake: Add cocoa powder and red food coloring for a dramatic and delicious red velvet bassoon cake.
Filling Options
Add a layer of filling between the cake layers to enhance the flavor and texture:
- Chocolate Ganache: Rich and decadent, perfect for chocolate lovers.
- Fruit Preserves: Raspberry or strawberry preserves add a fruity contrast to the cake.
- Cream Cheese Frosting: Tangy and smooth, pairs well with red velvet or carrot cake.
Health Benefits of Baking at Home
Baking at home, including making a bassoon cake Recipe, has several health benefits:
- Control Over Ingredients: You can choose high-quality, organic ingredients and control the amount of sugar and fat in your cake.
- Stress Relief: Baking can be a therapeutic activity that helps reduce stress and anxiety.
- Family Bonding: Baking with family members can be a fun and bonding experience, especially with children.
- Creativity: Baking allows you to express your creativity, which can be mentally stimulating and rewarding.
Creating a bassoon cake recipe is a delightful and rewarding project for music lovers and baking enthusiasts alike. By following this step-by-step guide, you can craft a cake that not only tastes delicious but also pays tribute to the beautiful bassoon. Whether it’s for a special occasion or simply to enjoy the process of baking and decorating, this cake is sure to impress and bring joy to anyone who sees and tastes it. So gather your ingredients, unleash your creativity, and enjoy making your very own bassoon cake!
Frequently Asked Questions (FAQs)
Can I make a bassoon cake without fondant?
Yes, you can make a bassoon cake recipe without fondant. Use buttercream frosting to create the shape and details of the bassoon. You can use a piping bag with different tips to add the keywork and other features.
How far in advance can I make a bassoon cake?
You can bake the cake layers up to two days in advance and store them tightly wrapped in plastic wrap at room temperature. The assembled and decorated cake can be made a day ahead and stored in the refrigerator. Bring it to room temperature before serving.
Can I freeze a bassoon cake?
Yes, you can freeze the cake layers before decorating. Wrap them tightly in plastic wrap and aluminum foil. Thaw in the refrigerator overnight before assembling and decorating. It’s not recommended to freeze a fully decorated cake.
What flavors work best for a bassoon cake?
Vanilla and chocolate are classic flavors that work well for a bassoon cake. However, you can experiment with other flavors such as lemon, red velvet, or carrot cake to suit your taste.
How do I transport a bassoon cake?
To transport a bassoon cake, place it in a sturdy cake box or on a cake board. Ensure it is kept on a flat surface in your vehicle and avoid sudden stops or sharp turns. If possible, have someone hold the cake while driving to prevent any mishaps.
