How to Make Gujiya Recipe: Create Perfect Home Made Sweet Treat
Indian festivals are always full of color, joy, and of course, delicious sweets. One of the most beloved treats that takes center stage during festive occasions like Holi, Diwali, and Makar Sankranti is gujiya. Along with other popular snacks like Shakarpara and Namakpara, gujiya is a must-have during these celebrations. Whether you’re hosting a celebration or simply want to indulge in a traditional treat, learning how to cook gujiya is a must. With this comprehensive gujiya recipe, you’ll learn everything from the ingredients for gujiya to the step-by-step gujiya recipe that will leave your family and friends coming back for more!
So, let’s get started! If you’re wondering how to make gujiya, we’ve got you covered.
What is Gujiya?
Before we dive into the detailed gujiya recipe, let’s first understand what gujiya is all about. Gujiya is a deep-fried pastry filled with a rich mixture of khoya (mawa), dry fruits, coconut, and flavored with cardamom and sugar. The dough is prepared with all-purpose flour and ghee (clarified butter), giving the pastry its signature crisp texture and rich taste. While gujiya is traditionally made during festivals like Holi and Diwali, it’s a delicious treat that can be enjoyed anytime you crave something sweet.
Now that you have an idea of what gujiya is, let’s move on to the recipe ingredients and how to prepare this tasty snack from scratch!
Ingredients for the Gujiya Recipe

To make gujiya, you need a few essential ingredients for both the dough and the filling. Below, you’ll find a list of what you’ll need to make this delightful treat.
For the Dough:
- 2 cups of all-purpose flour (maida) – This forms the base of the gujiya dough.
- 3 tablespoons of ghee (clarified butter) – Adds a rich, buttery flavor to the dough and helps make it crisp.
- 1/4 teaspoon of salt – Just a pinch to balance the sweetness of the filling.
- Water – To knead the dough and form a smooth, pliable texture.
- 1 tablespoon of semolina (optional) – This helps give the dough an extra crispiness. It’s optional but recommended.
For the Filling:
- 1 cup of khoya (mawa) – This is the key ingredient in the filling, lending a rich, creamy texture. You can use store-bought khoya or make it at home.
- 1/2 cup of powdered sugar – Sweetens the filling.
- 1/4 cup of grated fresh coconut (optional) – Adds texture and flavor to the filling.
- 1/4 cup of mixed dry fruits (cashews, almonds, pistachios, raisins) – These provide crunch and a rich flavor to the gujiya.
- 1/2 teaspoon of cardamom powder – For that aromatic, spicy-sweet flavor that’s a hallmark of many Indian sweets.
- 1 tablespoon of melon seeds or pumpkin seeds (optional) – Adds an extra layer of flavor and texture.
For Frying:
- Ghee or oil – You’ll need enough ghee or oil to deep fry the gujiyas. Ghee is often preferred for its flavor, but you can use oil as well.
How to Cook Gujiya Recipe: A Step-by-Step Guide

Now that we’ve covered the gujiya recipe ingredients, let’s move on to the fun part: preparing the gujiya! Here is a simple, step-by-step gujiya recipe that will guide you through each stage of the process.
Step 1: Preparing the Dough
- Mix the Dry Ingredients: Start by placing the all-purpose flour (maida) and salt in a large mixing bowl. If you’re using semolina, add that as well.
- Add Ghee: Next, add the ghee to the flour mixture. Using your fingers, rub the ghee into the flour until it resembles breadcrumbs. This step is essential to create a flaky, crispy texture for your gujiya dough.
- Add Water: Gradually add water to the mixture, little by little, until the dough starts to come together. Knead it into a soft, smooth dough. The dough should be firm but pliable, similar to the texture of dough used for parathas or pooris.
- Rest the Dough: Once your dough is kneaded, cover it with a damp cloth or plastic wrap and allow it to rest for 20-30 minutes. This resting time helps soften the dough and makes it easier to roll out.
Step 2: Preparing the Filling
- Cook the Khoya: Heat a non-stick pan over medium heat. Add the grated khoya and cook it for a few minutes, stirring continuously, until it becomes slightly golden. This helps remove any moisture and ensures the filling is not too watery.
- Add Coconut (Optional): If you’re using grated coconut, add it to the cooked khoya and stir for another 1-2 minutes. Coconut adds a lovely texture and flavor to the filling.
- Add Sugar and Spices: Now, add the powdered sugar and cardamom powder to the khoya mixture. Stir the mixture until the sugar completely dissolves and the filling becomes thick. The cardamom adds a fragrant aroma that complements the richness of the khoya.
- Add Dry Fruits: Chop the dry fruits (cashews, almonds, pistachios) and add them to the khoya mixture. You can also add raisins for a burst of sweetness. Stir everything well and cook for another 2-3 minutes.
- Cool the Filling: Once your filling is done, remove it from the heat and let it cool completely. The filling must be cool before you stuff it into the dough to prevent it from becoming soggy.
Step 3: Shaping the Gujiya
- Divide the Dough: After the dough has rested, divide it into small, equal-sized balls (about 1 to 1.5 inches in diameter). These will form the individual gujiyas.
- Roll the Dough: Using a rolling pin, roll each ball of dough into a small circle, about 4-5 inches in diameter. Dust your surface with a little flour to prevent the dough from sticking.
- Add the Filling: Place a spoonful of the cooled filling in the center of each dough circle. Be careful not to overfill the gujiya, as too much filling can cause it to burst during frying.
- Seal the Gujiya: Carefully fold the dough over the filling to form a half-moon shape. Press the edges firmly together to seal the gujiya. You can use a fork to press down the edges or pinch them together to create a decorative edge.
- Prepare for Frying: Repeat this process for all the dough balls. Ensure that the gujiyas are tightly sealed so the filling doesn’t spill out while frying.
Step 4: Frying the Gujiya
- Heat the Ghee or Oil: Heat enough ghee or oil in a deep pan or kadhai over medium heat. To check if the oil is hot enough, drop a small piece of dough into the oil. If it rises to the surface immediately, the oil is ready.
- Fry the Gujiyas: Gently place the gujiyas into the hot oil. Fry them in batches to avoid overcrowding the pan. Fry the gujiyas on low-medium heat, turning them occasionally, until they are golden brown and crisp on all sides. Be patient and avoid increasing the heat, as this can cause the gujiyas to cook unevenly.
- Drain Excess Oil: Once the gujiyas are cooked to a golden brown, remove them from the oil and place them on a paper towel to drain excess oil.
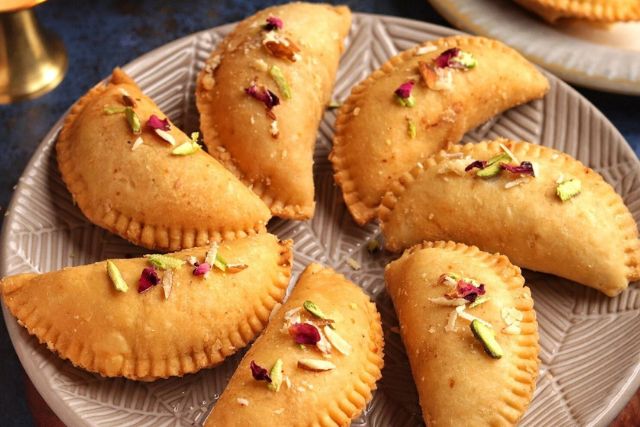
- Serve and Enjoy: Let the gujiyas cool slightly before serving. They can be enjoyed warm or at room temperature. You’ll notice how crispy the exterior is, with a sweet, flavorful filling inside!
Tips for Perfect Gujiya Recipe

- Don’t Overstuff the Gujiya: While it’s tempting to add a lot of filling, overstuffing can cause the gujiya to break open while frying. A moderate amount of filling is ideal.
- Use Fresh Khoya: For the best flavor, try to use fresh khoya. It gives the filling a richer, creamier texture compared to milk powder substitutes.
- Fry on Low Heat: Fry gujiyas on medium to low heat for an even golden color and to ensure they cook through without burning the exterior.
- Freeze for Later: You can prepare gujiya in advance and freeze them before frying. Place the shaped gujiyas on a tray and freeze them for a few hours. Once frozen, store them in an airtight container or freezer bag. Fry them directly from frozen when you’re ready to serve!
- Storage: Store leftover gujiya in an airtight container at room temperature for up to a week. They may lose some of their crispiness, but they’ll still taste delicious.
Conclusion: Enjoy Your Homemade Gujiya!
Learning how to cook gujiya from scratch is an incredibly satisfying experience. This gujiya recipe combines the perfect balance of crispy dough and a rich, flavorful filling. Whether you’re celebrating a festival like Holi or simply want to treat your loved ones to something special, this gujiya recipe will certainly impress.
From the gujiya recipe ingredients to the step-by-step gujiya recipe, we’ve covered everything you need to create these golden, sweet treats in your kitchen. So, gather your ingredients, roll up your sleeves, and get ready to enjoy a fresh batch of homemade gujiya!
Frequently Asked Questions (FAQs)
Can I make gujiya without khoya?
Yes, you can replace khoya with milk powder, coconut, and a little ghee to create a similar texture and flavor. However, khoya will give you a richer filling.
Can I bake gujiya instead of frying?
Yes, baking is a healthier option! Preheat the oven to 350°F (175°C) and bake the gujiyas for 20-25 minutes, flipping them halfway through. They won’t be as crispy as fried gujiyas but will still be delicious.
How long can I store Gujiya?
Gujiya can be stored in an airtight container for up to 1 week at room temperature. If you want to keep them for longer, you can freeze them for up to 3 months.
What can I use instead of Ghee for the Gujiya Dough?
While ghee provides the best flavor and texture for the dough, you can use vegetable oil as a substitute. However, the taste and crispiness may not be as rich as when using ghee.
Can I make gujiya ahead of time?
Yes, gujiya can be prepared ahead of time and frozen. Shape the gujiyas, freeze them, and fry them when you’re ready to serve. They’ll still taste great!