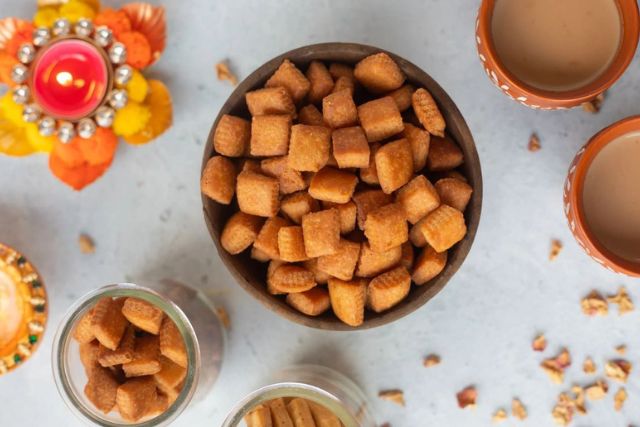
Shakarpara Recipe: Perfect Crispy Indian Sweet Snack
Shakarpara, also known as Shankarpali, is a popular Indian snack enjoyed by people of all ages. This crispy, sweet treat is traditionally made during festivals like Diwali, Holi, and Navratri, but can be enjoyed throughout the year as a quick snack or with tea. Made with simple ingredients such as flour, sugar, ghee, and milk, Shakarpara Recipe is easy to prepare, yet deliciously satisfying.
What is Shakarpara?
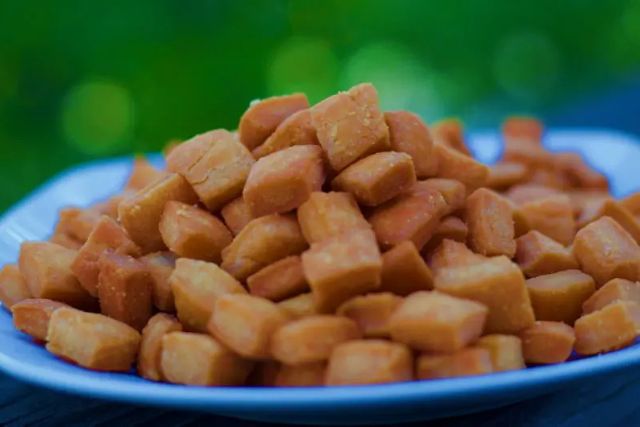
Shakarpara (also called Shankarpali in some regions) is a traditional Indian sweet snack made by frying dough pieces that are flavored with sugar, ghee, and cardamom. It is crispy on the outside and lightly sweet, making it the perfect snack to munch on with a cup of tea or coffee. The treat is known for its versatility; it can be made in several variations, such as with whole wheat flour for a healthier version or with flavored sugar syrup for extra sweetness.
In India, Shakarpara is typically made during festivals such as Diwali (Festival of Lights) and Holi, but its popularity extends beyond just these special occasions. Whether it’s a festive treat or an everyday snack, Shakarpara holds a special place in Indian cuisine. This recipe for Shakarpara is a great way to bring this beloved treat into your kitchen, perfect for any occasion.
Ingredients for Shakarpara Recipe
The ingredients used in making Shakarpara are simple and easily available in most kitchens. Here’s what you’ll need:
For the Dough:
- 1 cup all-purpose flour (maida)
- 1/4 cup semolina (sooji) – This adds a nice crunch to the Shakarpara.
- 1/4 cup powdered sugar – You can adjust the sweetness based on preference.
- 1/4 teaspoon cardamom powder (optional) – Adds a fragrant and slightly spicy aroma.
- 1/4 teaspoon baking powder – Helps the dough puff up slightly during frying.
- A pinch of salt – Balances the sweetness and enhances the flavor.
- 2-3 tablespoons milk (adjust as needed to form a dough)
- 2 tablespoons ghee (clarified butter) – Adds richness and flavor to the Shakarpara.
For Frying:
- Ghee or oil – To deep fry the Shakarpara. Ghee provides a more authentic flavor, but oil can be used as a healthier alternative.
Optional Sugar Syrup Coating:
- 1/2 cup sugar
- 1/4 cup water – To prepare the syrup for glazing the Shakarpara after frying.
Step-by-Step Shakarpara Recipe | How to Make
Step 1: Prepare the Dough
- Mix Dry Ingredients: Start by combining the all-purpose flour (maida), semolina (sooji), baking powder, cardamom powder, and a pinch of salt in a large mixing bowl. The semolina gives Shakarpara its crispy texture, while the cardamom powder adds a fragrant flavor.
- Add Ghee: In a separate small bowl, warm 2 tablespoons of ghee. Ghee is the key ingredient that makes Shakarpara crispy and flavorful. Add this warm ghee to the dry ingredients and mix it well, ensuring the ghee is evenly incorporated into the flour mixture. This step will help the dough attain the right texture.
- Add Sugar: Now, add the powdered sugar to the mixture and mix thoroughly. The sugar will dissolve into the dough as you add the milk, making the dough slightly sweet.
- Form the Dough: Gradually add milk to the flour mixture, a little at a time, and knead to form a stiff dough. The dough should not be too soft; it should be firm but pliable. If the dough feels too dry, add more milk in small amounts. Once you’ve achieved the right consistency, cover the dough with a damp cloth and let it rest for about 15 minutes. This resting time allows the flour to absorb the moisture, making it easier to roll.
Step 2: Roll and Shape the Dough
- Divide the Dough: After the dough has rested, divide it into small portions. Roll each portion into a ball.
- Roll the Dough: On a clean, flat surface, roll each dough ball into a thin sheet, about 1/8 inch thick. The thinner the dough, the crispier the Shakarpara will be after frying.
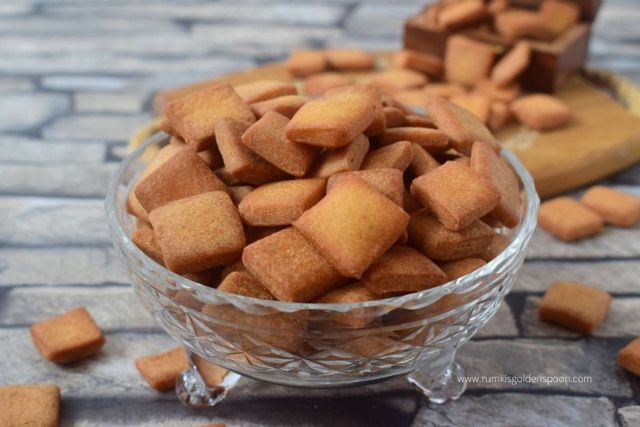
- Cut into Shapes: Use a sharp knife or pizza cutter to cut the rolled dough into square or diamond-shaped pieces. The size of the pieces can vary depending on your preference, but aim for small bite-sized pieces.
Step 3: Fry the Shakarpara
- Heat the Oil: In a deep frying pan or wok, heat ghee or oil over medium heat. The oil should be hot but not smoking. To check if the oil is ready, drop a small piece of dough into the oil. If it sizzles and rises to the surface, the oil is ready for frying.
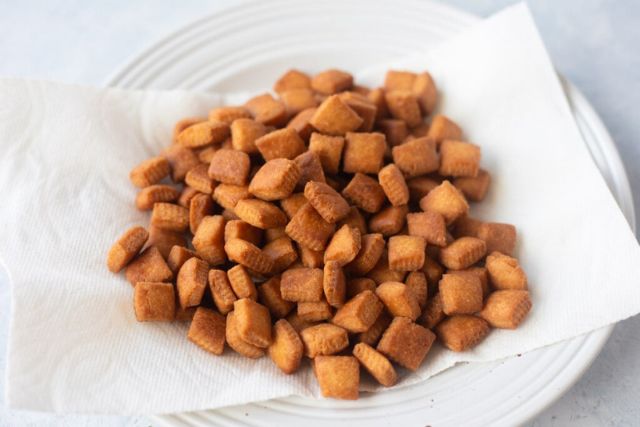
- Fry the Shakarpara: Fry the shaped dough pieces in small batches. Frying in batches ensures that the Shakarpara are evenly cooked and do not stick together. Keep stirring gently to ensure the pieces cook on all sides.
- Golden Brown: Once the Shakarpara turn golden brown and crispy, remove them from the oil using a slotted spoon. Place them on paper towels to absorb any excess oil.
Step 4: Optional Sugar Syrup Coating
- Prepare Sugar Syrup: While the Shakarpara are cooling, you can prepare a simple sugar syrup. In a small pan, combine 1/2 cup sugar and 1/4 cup water. Heat over medium flame, stirring occasionally until the sugar dissolves and the syrup thickens slightly.
- Coat with Sugar Syrup: Dip the fried Shakarpara into the sugar syrup and then place them on a tray to cool. The syrup will give the Shakarpara a shiny glaze and extra sweetness. If you prefer a less sweet version, you can skip this step.
Step 5: Serve and Enjoy
Your homemade Shakarpara is now ready to serve! Allow them to cool completely before storing them in an airtight container. They will stay fresh for up to a week.
Tips for Making Perfect Shakarpara Recipe
- Knead the Dough Firmly: The dough for Shakarpara should be firm, not too soft. A firm dough will give the Shakarpara a crispy texture after frying.
- Use Ghee for Extra Flavor: While you can use oil to fry, ghee gives Shakarpara its traditional flavor and rich aroma. If possible, use ghee for authentic taste.
- Roll the Dough Thinly: The thinner the dough, the crunchier the Shakarpara. Roll it out to about 1/8 inch thickness for the best results.
- Maintain Medium Heat for Frying: Fry the Shakarpara on medium heat. Too high of a temperature will burn them, while too low of a temperature will make them soggy.
- Avoid Overcrowding the Pan: Fry the Shakarpara in small batches to ensure they cook evenly and crisp up nicely.
- Rest the Dough: Allowing the dough to rest for 15 minutes helps it become easier to roll and results in a better texture.
Conclusion
Shakarpara is a simple, delicious, and crunchy Indian treat that anyone can make at home. With its golden color and sweet, crisp texture, it is a perfect snack to serve during festivals or as a treat with tea. By following the steps in this recipe and applying the tips provided, you’ll be able to make perfect Shakarpara every time.
For more these types of content, bookmark our website CookwithBisht. If you have any query regarding our content, must comment below. Don’t Forget to share our content with your friends, relatives and on social media websites. Thank You.
FAQs for Shakarpara Recipe
What is Shakarpara?
Shakarpara is a traditional Indian sweet snack made by frying small pieces of dough that are flavored with sugar, ghee, and cardamom. It is crispy, golden brown, and lightly sweet, making it a favorite during festivals and celebrations.
Can I use whole wheat flour instead of all-purpose flour?
Yes, you can substitute whole wheat flour for all-purpose flour for a healthier version of Shakarpara. However, the texture may be denser, and the Shakarpara may not be as crispy.
Can I skip semolina (sooji)?
Semolina adds a nice crunch to the Shakarpara. If you don’t have semolina, you can use more all-purpose flour, but the texture may differ slightly.
How do I make the Shakarpara extra crispy?
To make Shakarpara extra crispy, ensure the dough is firm, roll it thin, and fry on medium heat. Avoid overcrowding the frying pan, as this can lead to uneven frying.
Can I store Shakarpara for later?
Yes, you can store Shakarpara in an airtight container at room temperature for up to 1 week. For longer storage, keep them in the refrigerator for up to 2 weeks.